앱개발에서 Text 는 빼놓을수 없으며, 텍스트마다 스타일을 적용해야 합니다.
다만, 앱에 들어가는 텍스트는 일정 패턴이나 몇가지 스타일을 따릅니다.(텍스트마다 스타일이 다르면 UI적으로 난잡해보이겠죠)
이런 몇가지 패턴의 스타일을 Text 위젯을 사용할때마다 적용하는 것도 번거롭고, 추후 텍스트의 스타일 변경시에도 번거로운 작업이 아닐 수 없습니다.
이런 부분을 해소하고자 Theme를 사용합니다.
Theme를 이용하면 앱전체에 속성이 적용이되기때문에, 추후 Theme에서 설정값을 변경시 앱전체에 반영이 됩니다.
ThemeData
이미 기본 샘플 코드(프로젝트 생성시 자동으로 추가되는 코드)에 ThemeData가 구현되어 있습니다.
return MaterialApp(
  title: 'Flutter Demo',
  theme: ThemeData(
    // This is the theme of your application.
    //
    // Try running your application with "flutter run". You'll see the
    // application has a blue toolbar. Then, without quitting the app, try
    // changing the primarySwatch below to Colors.green and then invoke
    // "hot reload" (press "r" in the console where you ran "flutter run",
    // or simply save your changes to "hot reload" in a Flutter IDE).
    // Notice that the counter didn't reset back to zero; the application
    // is not restarted.
    primarySwatch: Colors.blue,
  ),
위의 코드와 같이, MeterialApp 의 속성으로 theme: 가 있고, 여기에 ThemeData를 적용합니다.
(MeterialApp의 속성에는 theme외에도 darkTheme, highContrastTheme,.. 등 여러 theme 속성이 있으니, 궁금하신 분은 공부해보셔도 좋을것 같습니다.)
이미 적용되어 있는 primarySwatch 속성은 MaterialColor 위젯을 적용하는 것으로, 해당 색상을 적용시 Flutter 에서 알아서 테마에서 사용하는 다른 색상도 잘 적당히(?) 맞춰서 적용을 해주는 기능을 합니다.
번거롭게 모든 테마 칼라를 적용할 필요가 없다는 것이죠.
이는 텍스트 칼라 적용시에도 사용합니다. 관련된 내용은 아래 설명 드리겠습니다.
ThemeData 위젯에도 무진장 많은 속성들이 존재하는데, 그중 우리는 TextTheme? textTheme 를 사용합니다.
TextTheme
이름만 봐도 딱 감이 오시겠지요?! 텍스트 관련 테마를 적용하는 위젯입니다.
자세히 살펴보겠습니다.
@immutable
class TextTheme with Diagnosticable {
  /// Creates a text theme that uses the given values.
  ///
  /// Rather than creating a new text theme, consider using [Typography.black]
  /// or [Typography.white], which implement the typography styles in the
  /// material design specification:
  ///
  /// <https://material.io/design/typography/#type-scale>
  ///
  /// If you do decide to create your own text theme, consider using one of
  /// those predefined themes as a starting point for [copyWith] or [apply].
  const TextTheme({
    this.headline1,
    this.headline2,
    this.headline3,
    this.headline4,
    this.headline5,
    this.headline6,
    this.subtitle1,
    this.subtitle2,
    this.bodyText1,
    this.bodyText2,
    this.caption,
    this.button,
    this.overline,
  });

  /// Extremely large text.
  final TextStyle? headline1;

  ....
}
이미 내부적으로 headline1~6, subtitle, bodyText,.. 등등 여러가지 속성이 정의되어 있습니다.
그리고, 우리는 이를 재정의하여 사용할수 있습니다.
저 같은 경우에 TextTheme에서는 fontFamily, size, weight, fontStyle 정도 설정하고, color 은 위에서 설명드렸던 Theme의 color에서 제어를 합니다.
예제로 TextTheme에 이미 정의된 headline3을 재정의 해보도록 하겠습니다.
return MaterialApp(
    title: 'Flutter Demo',
    theme: ThemeData(
    	...
        textTheme: const TextTheme(
            headline3: TextStyle(
                fontSize: 20,
                fontWeight: FontWeight.w500,
                fontStyle: FontStyle.italic))),

	...
}
위의 코드와 같이 MaterialApp에 theme 속성의 ThemeData에 textTheme 속성에 TextTheme를 추가하여 headline3에 대해 TextStyle를 정의한 코드입니다.
textTheme를 사용하는 방법은 아래와 같습니다.
Text(
  "헤드라인3이 적용된 텍스트입니다.",
  style: Theme.of(context).textTheme.headline3,
)
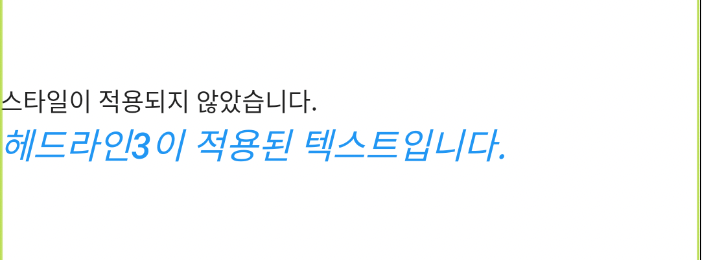
텍스트 위젯의 style에 테마의 headline3를 적용하면 됩니다.
아래의 결과 화면과 같이 일반 텍스트와 headline3 테마가 적용된 텍스트가 다름을 확인하실 수 있습니다.

자, 여기서 궁금증이 생깁니다.
색상은 어떻게 적용을 해야 할까요?
기존에는 Text 위젯의 style 속성으로 TextStyle()에서 color를 적용했는데..
그렇다면 headline3 테마에 색상을 적용하게 되면, headline3 를 사용하는 앱전체에 적용이 될테고....
copyWith
기존 테마값은 그대로 사용하고, copyWith 에 추가한 속성만 변경해주는 함수입니다.
Text(
  "헤드라인3이 적용된 텍스트입니다.",
  style: Theme.of(context)
      .textTheme
      .headline3!
      .copyWith(color: Theme.of(context).colorScheme.primary),
)
위와같이 color 만 primary 색상이 적용하도록 수정하였습니다.
아래와 같이 결과를 보실수 있습니다.
위의 코드와 같이 색상값을 적용시, 색상을 변경하고 싶다면, Theme color를 변경하면 됩니다.
return MaterialApp(
    title: 'Flutter Demo',
    theme: ThemeData(
        primarySwatch: Colors.red,
        ...
    )
)
ThemeData에서 priarySwatch 의 색상값을 변경하면 텍스트의 칼라도 자동으로 변경이 됩니다.
이제 font Family 에 대해서 구현을 해볼 차례입니다.
인터넷으로 무료 폰트를 다운로드 받습니다.
(저는 네이버 무료 폰트를 이용했습니다.)

맘에드는거 하나 골라서 다운로드!!
다운로드 파일을 확인하니 ttf 파일이네요. otf 파일도 가능하니 걱정하지 마세요.
(둘다 지원한다면 파일 사이즈가 작은 것을 사용하시는 것을 추천드립니다.)
1. 프로젝트 assets 디렉토리에 fonts 디렉토리를 생성합니다.

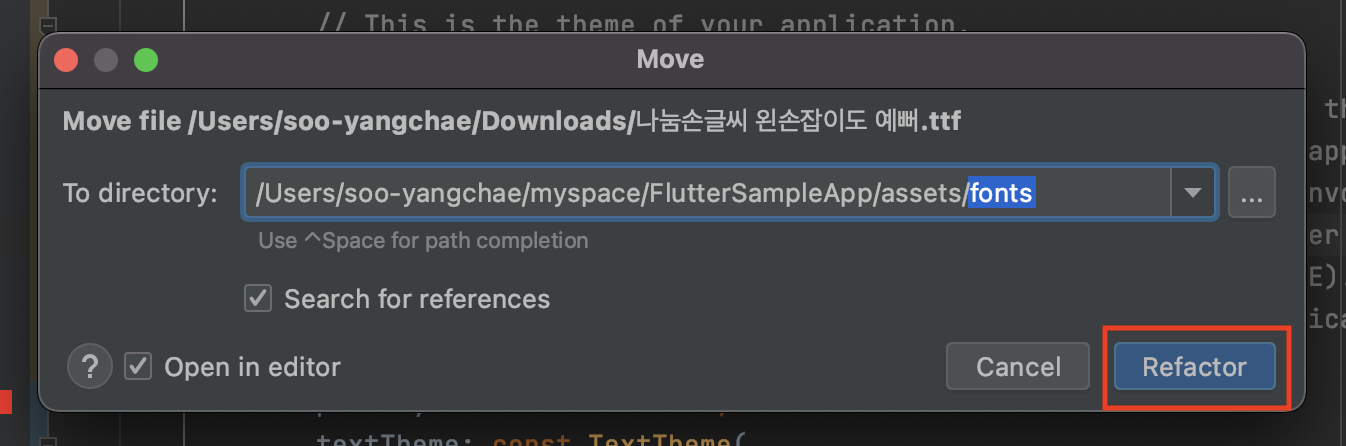
2. 다운로드한 폰트파일을 fonts 디렉토리에 드래그앤드랍을 합니다.
그럼, 아래 그림과 같이 팝업이 표시됩니다. "Refactor" 버튼을 눌러줍니다.
3. pubspec.yaml 파일에 추가한 폰트를 등록합니다.
pubspec.yaml 파일 내용을 보다보면, font 항목이 주석처리되어 있습니다.
해당 부분에 주석을 해제합니다.
이때, 주석해제시 앞쪽 공백이 2칸인지 여부를 꼭 확인하셔야 합니다.(아래 그림에 빨간 표시부분)
그리고, 그 다음줄 들여쓰기도 2칸을 꼭 지켜야 합니다. - 안그럼 에러나요~
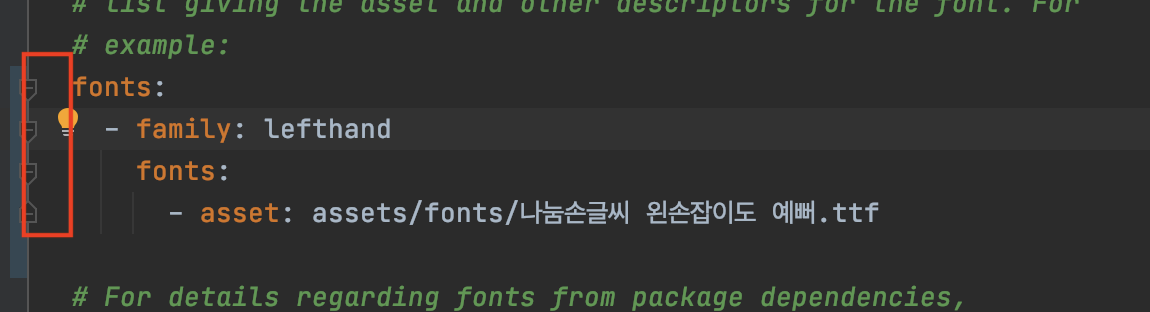
위의 그림과 같이 fonts - family: 항목에서 앱내에서 사용할 명칭을 입력합니다.
fonts - fonts - asset: 항목에는 실제 폰트 파일의 저장 경로를 등록합니다.
4. 폰트를 Theme를 이용하여 앱전체에 적용하겠습니다.
ThemeData(fontFamily: '{앱내에서 사용할 명칭}') 을 넣어주시면 앱 전체 적용이 됩니다.
return MaterialApp(
title: 'Flutter Demo',
theme: ThemeData(
...
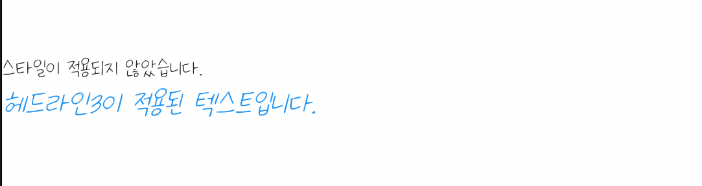
fontFamily: 'lefthand'
),
적용된 결과 입니다.
4-1. 나는 앱전체 말고, 특정 textTheme 에만 적용하고 싶다면?
일단 기존에 ThemeData에 적용했던 fontFamily 를 삭제합니다.
그리고, textTheme에 fontFamily 를 적용하면 됩니다.
return MaterialApp(
    title: 'Flutter Demo',
    theme: ThemeData(
      ...
      textTheme: const TextTheme(
          headline3: TextStyle(
              fontFamily: 'lefthand',
              ...
              )),
    ),
4-2. 특정 Text 위젯에만 적용하고 싶다면?
이것도 비슷합니다. 일단 테스트를 위해 기존에 Theme에 적용된 fontFamily를 삭제합니다.
그리고, 원하시는 Text 위젯에 fontFamily 를 추가해주면 됩니다.
Text(
  "헤드라인3이 적용된 텍스트입니다.",
  style: Theme.of(context).textTheme.headline3!.copyWith(
      color: Theme.of(context).colorScheme.primary,
      fontFamily: 'lefthand'),
)
전체 소스 코드는 아래 Github 링크를 참고해주세요.
GitHub - rcbuilders/FlutterSampleApp: flutter study sample project
flutter study sample project. Contribute to rcbuilders/FlutterSampleApp development by creating an account on GitHub.
github.com
'Flutter' 카테고리의 다른 글
| [Flutter Dev] 애니메이션 Splash / Intro 화면 전환 만들기 - AnimatedSwitcher (0) | 2022.01.29 |
|---|---|
| [Flutter Dev] 디버깅을 위한 logger 를 사용해보자. (0) | 2022.01.24 |
| [Flutter Dev] 로컬 / 네트워크 이미지 화면에 표시하기 (0) | 2022.01.19 |
| [Flutter] Flutter에서 SVG 이미지 사용하기 (0) | 2022.01.17 |
| [Flutter Dev] 라이트 / 다크 모드 테마 변경하기 (1) | 2022.01.14 |


